Adding Stripe to a Blitz application
8 min read ·
Disclaimer: you won’t find a complete solution in this blog post. I’ll talk about something that worked for my project and how I dealt with adding Stripe. I’m doing it 1) as a part of build in public*, 2) hoping it can be helpful for somebody. It’s also not a tutorial — I will go through the data flow, database model, and other things related to adding Stripe to a Blitz project. If you decide to do something similar, make sure it fits your particular use case!*
Introduction
I’m currently building Commont — a hosted platform for comments. You can think of it as a headless Disqus alternative. Commont gives you an SDK, API, or a React hook to connect to from your frontend application, as well as an admin panel where you can manage your comments — hide them, delete, create new projects, etc.
The application is built with Blitz — The Fullstack React Framework. I’m assuming that if you’re reading this blog post, you’ve already heard about Blitz — if not, go check out the docs!
I wanted to make money out of that, which meant I needed to integrate a payment system. After a little bit of research, I decided to go with Stripe. (Paddle was a strong alternative, and in my next side project, I’m definitely going to try Lemon Squeezy.)
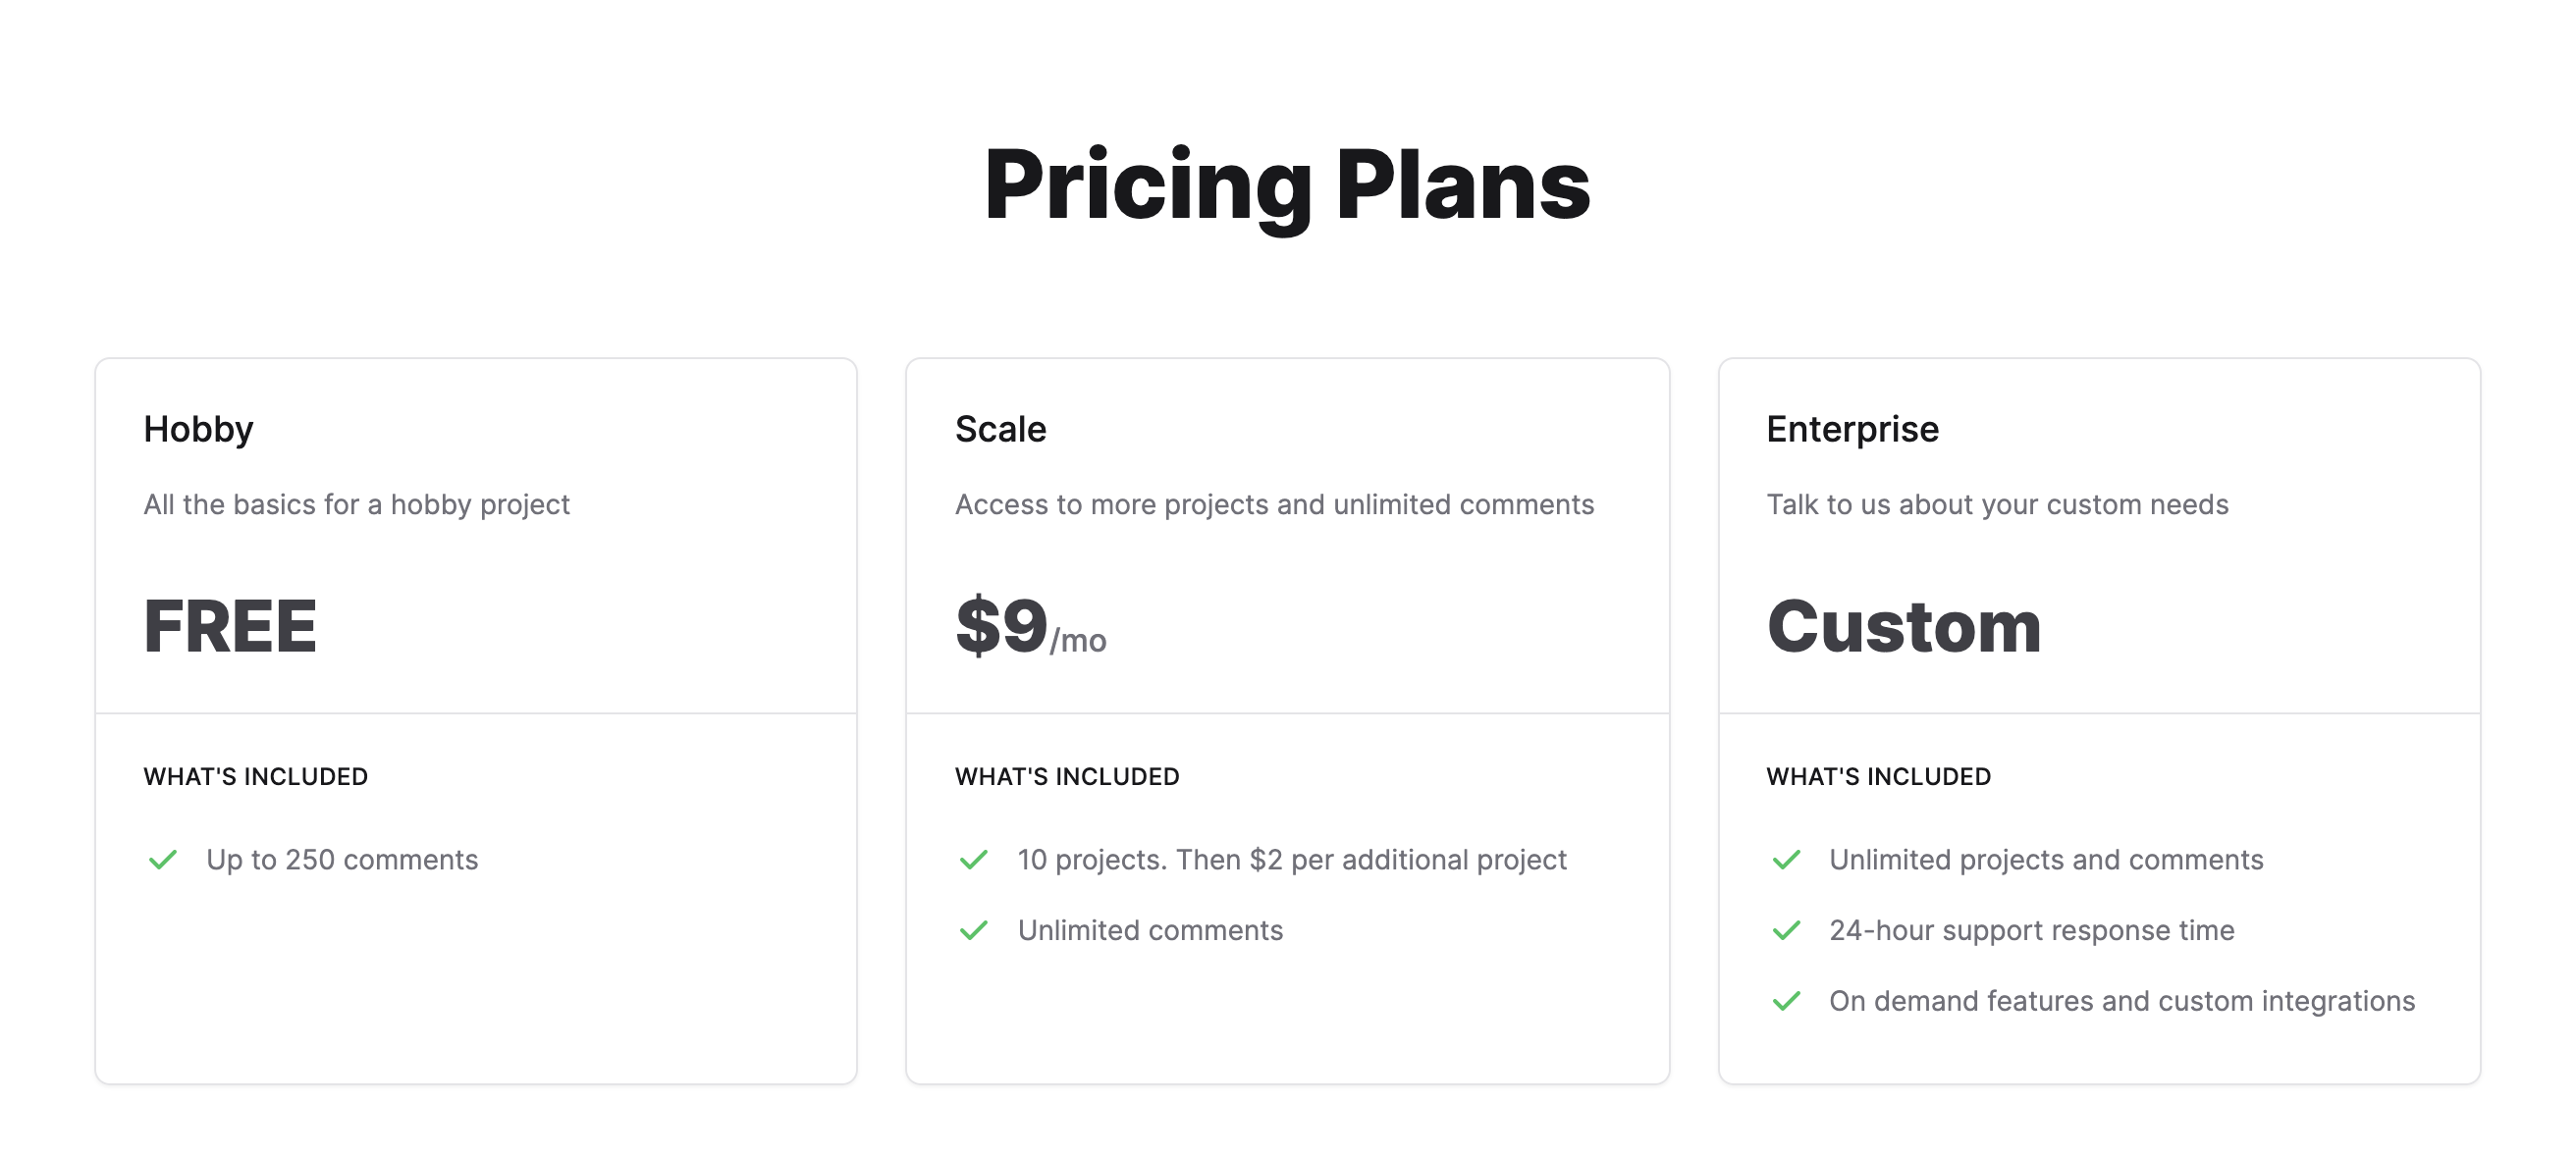
Pricing model
My pricing model assumes a free plan, where you can have one project and up to 1000(?) comments. If you want to create more projects and have unlimited comments, you can upgrade to a paid plan. It assumes a flat fee for 10(?) projects, and if that’s not enough, you can pay for additional projects.
What information do I need from Stripe?
I have a Users table in the database, where I store basic info about the users, their projects, and soon also their SaaS subscriptions. When it comes to subscriptions, I need to know the following:
- Whether a user has a subscription created with Stripe,
- If yes, what’s the current billing period,
- If yes, what is the status of the subscription — is it active, was it canceled, etc.?
- What is the corresponding Stripe subscription’s id.
I plan to store this information in a Subscriptions table looking somehow like this:
Stripe Checkout
I wanted to offload as much as possible to Stripe, so I decided to use Stripe Checkout:
The quickest way to build conversion-optimised payment forms, hosted on Stripe. Checkout creates a secure, Stripe-hosted payment page that lets you collect payments quickly.
To use Stripe’s Checkout, we have to:
- Have a Stripe account,
- Create a new checkout session with the Stripe SDK on the backend,
- Get an URL from the newly created session and redirect the user to this URL.
Stripe docs already perfectly describe all of it, so I won’t go into details. Stripe’s documentation is one of the best I ever saw, and I think you can find all the information you want there. I recommend checking out those two links to learn more about subscriptions with Checkout and sample integrations:
As I mentioned, this post is not a tutorial. It’s more of a dev diary of how to put it all together with a Blitz application. The following steps cover what to do on the Blitz project side to add Stripe. For how to create a Stripe account and product, check out Stripe’s docs.
Installing Stripe’s dependencies
sh
sh
The former library provides convenient access to the Stripe API from the application’s backend. The latter lets us use Stripe’s API in the browser.
Creating a new checkout session on the backend
I’m using a Blitz mutation to create a server function that handles new Stripe’s checkout sessions.
Blitz mutations are plain, asynchronous JavaScript functions that always run on the server.
In this function, I’m doing the following:
- Initializing Stripe with a secret key. You can read about Stripe’s keys here.
- Using Blitz resolver to make sure users using this mutation are authorized.
- Creating a new session with
stripe.checkout.sessions.createand passing a config object.
ts
ts
Stripe Checkout on the frontend
What all do we have to do on the frontend? We need a button to trigger the mutation we just talked about. We also need to redirect to Stripe so that users can fill in all the data and actually buy the product.
I have a tiny component, CreateSubscription, where I’m doing the following:
- Initialize a
createCheckoutMutation, - Initialize a
createCheckoutfunction that will be called on a button’s click. Inside of this function, I’m calling the mutation and waiting for a result. - Once I have the session id from a successfull mutation call, I’m using
stripe.redirectToCheckoutand pass the id. That moves the user to Stripe’s website, where they can complete the checkout.
tsx
tsx
Is it all?
Looks like it. Users can successfully create a subscription. If I go to Stripe’s dashboard, I’ll be able to see users’ data. But we don’t have a way to tell whether a particular user is on a paid plan in the application. We have no link between our users and Stripe’s customers. As said before, we need to fill the Subscription table in our backend to be able to:
- Identify paid customers,
- Display information about the user’s plan.
That’s where Stripe webhooks come into play.
Stripe webhooks
Webhooks allow us to receive event notifications about all kinds of actions happening with our account, e.g., new subscriptions, successful payments, failed payments, subscription cancels, and many more. Our application can perform some actions on all of those events—for example, update the database after a new subscription is created.
To handle those events, we need a new API endpoint.
I’m creating one in app/api directory:
(This code is quite simplified for the sake of this article.)
ts
ts
So, what’s going on here? Let’s take a look at the webhook function.
- First, I’m extracting the request body. Since Stripe needs the raw body, I have a little
getRawDatahelper. I’m also exporting a config object at the end of the file withbodyParserset to false. (There are a few other workarounds for this: https://github.com/stripe/stripe-node/issues/341.) - Then, I’m using
stripe.webhooks.constructEventand passing a signature from a request and my webhook secret. I’m doing it to verify the events that Stripe sends. You can read more about why it’s important here. - I have a switch statement in which I’ll handle particular events.
- In the end, I’m returning a 200 response to acknowledge receipt of the event.
What are all the events we need to handle?
There can be plenty of events coming from Stripe, but we don’t necessarily have to care about all of them. In some cases, you may want to know about all updates to a customer profile, payments methods, etc. In my application, I don’t. I only want to know a bit about the subscription and its status. Let’s see what happens when a user successfully creates a subscription. These are all the events that the webhook receives:
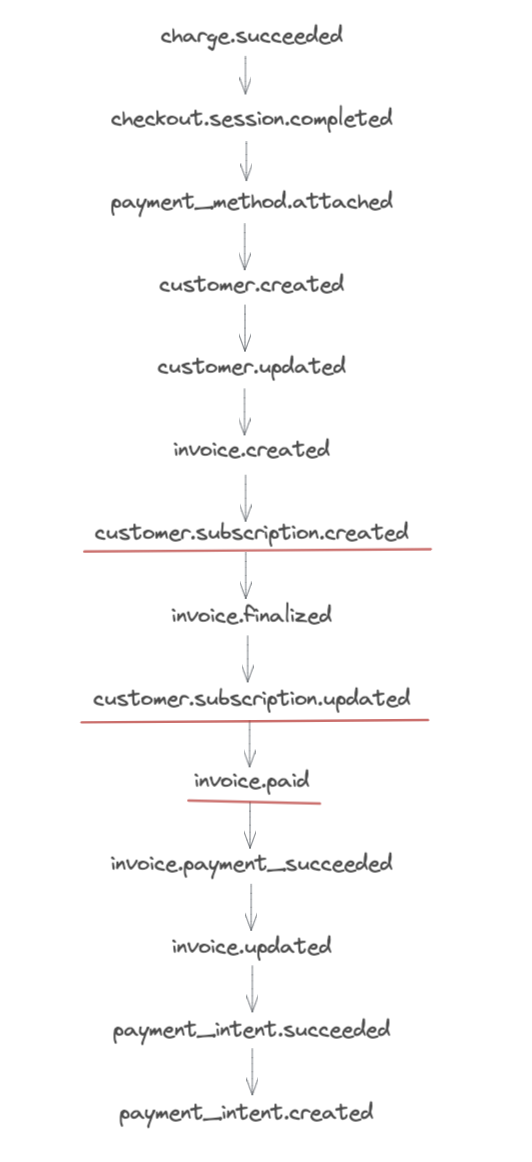
I marked the ones that are crucial for my application. It doesn’t mean that the webhook only needs to handle three events. There are a few more that I need to take care of: payment failures, subscription cancels, subscription updates (e.g., after changing quantity). However, let’s focus on those three for now.
Note: this is an arbitrary order that I got after one of many executions of creating a new subscription. Stripe does not guarantee an order of events.
https://stripe.com/docs/webhooks/best-practices#event-ordering:
Stripe does not guarantee delivery of events in the order in which they are generated. For example, creating a subscription might generate the following events:
- customer.subscription.created
- invoice.created
- invoice.paid
- charge.created (if there’s a charge)
Your endpoint should not expect delivery of these events in this order and should handle this accordingly.
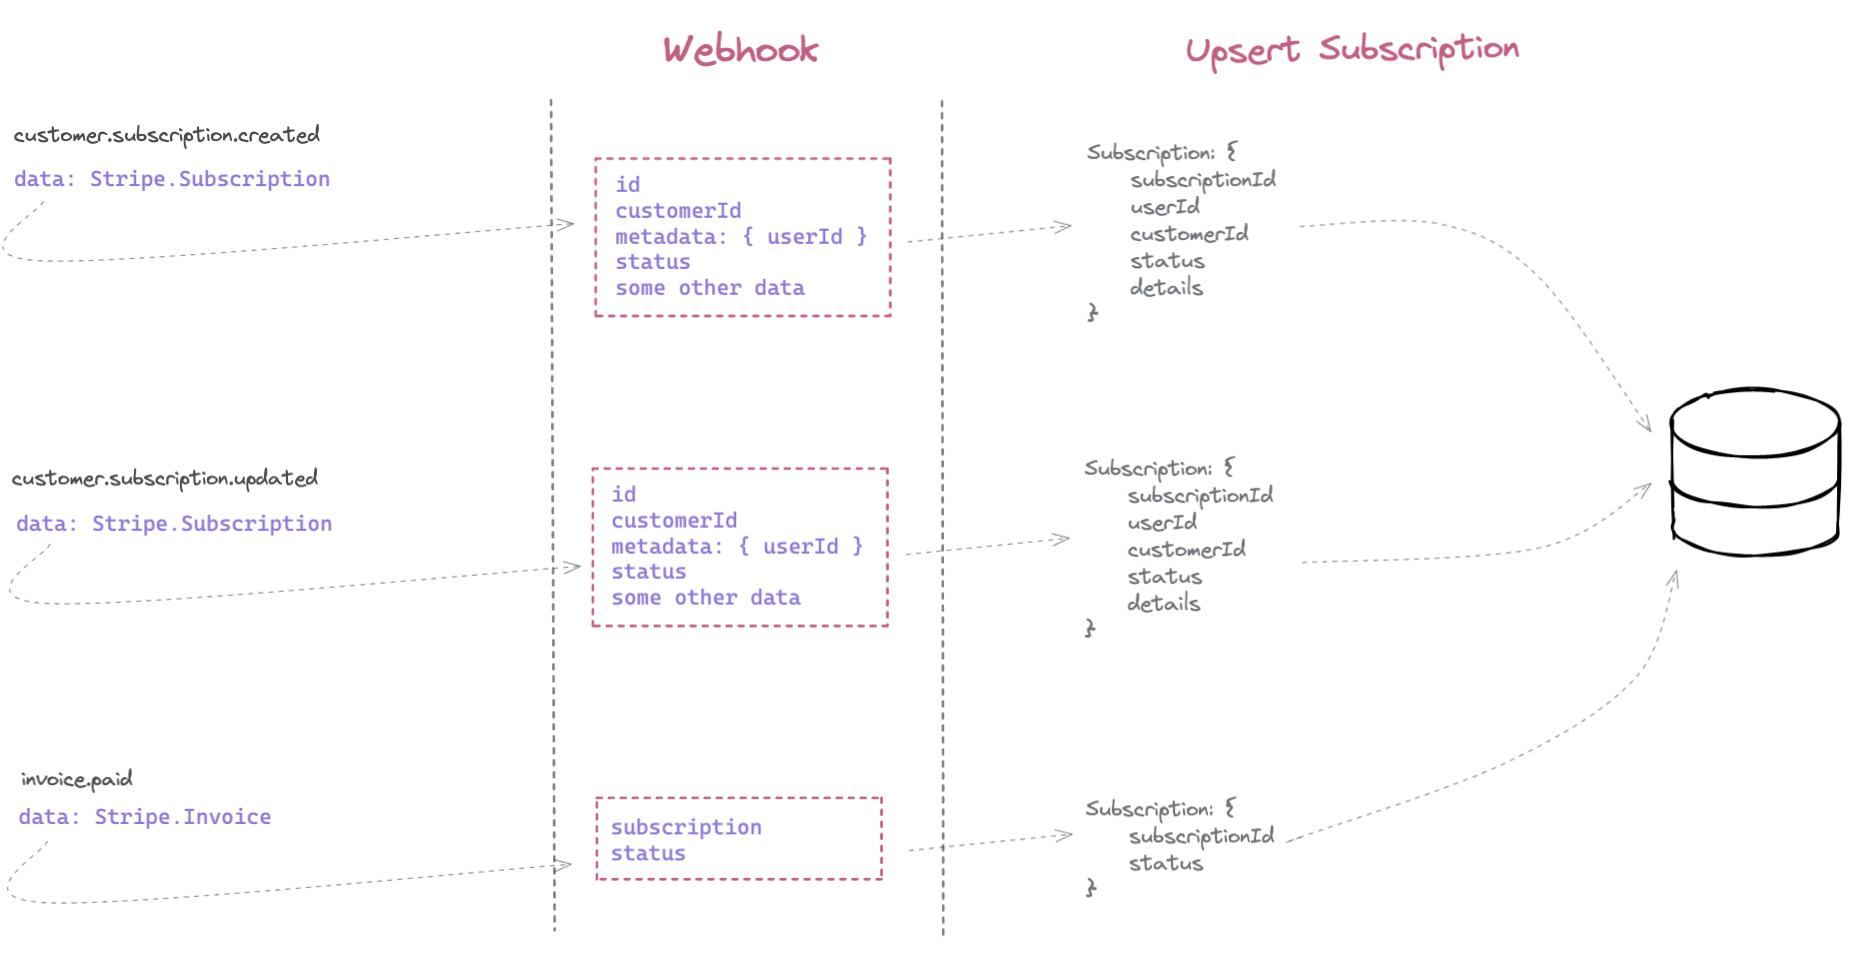
Updating the database
What should happen when I receive one of those events? I want to upsert data in the Subscriptions table.
Upsert: An operation that inserts rows into a database table if they do not already exist, or updates them if they do.
Why upsert? Because I can’t rely on the order and assume that any of those events can be first. Hence each one of them should trigger:
- Create a subscription if there’s no subscription with a given id,
- Update data in a subscription entry otherwise.
Even if invoice.paid event comes first, I still want to create a new entry and then update missing data on customer.subscription.updated and customer.subscription.created.
The data I get from invoice.paid is of type Stripe.Invoice, and from the remaining two, I get Stripe.Subscription. Nevertheless, the code will look fairly similar, somehow like this:
ts
ts
Okay. But what about the user? We still don’t have a way to link those subscriptions to the users from our system. While there are multiple ways to do it, I’m going to show you what worked best for me.
In the createCheckoutSession.ts file, I’m passing one more piece of information to the stripe.checkout.sessions.create function — a metadata object with a user_id property.
ts
ts
It allows me to extract the user’s id from Stripe.Subscription objects:
ts
ts
The final webhook’s flow looks in the following way:
Summary
Okay, that’s it! As promised, this wasn’t a tutorial, and this article is not sufficient to add a Stripe integration. However, I hope it will answer a few doubts you might have had about Stripe and Blitz integration! If you recently did the same and want to share your thoughts and feedback, you can reach out to me on Twitter.