Getting into the holiday spirit with Astro, React, and Supabase
11 min read ·
Introduction
Christmas is just around the corner, and it’s time to start thinking about gift-giving. In this blog post, we will explore how to use the Astro framework in combination with React and Supabase to create a simple app that lets you draw names for a Secret Santa gift exchange. By the end of this post, we will have a working app that we can use to make gift exchange more organized and fun. Let’s get started!
Motivation
Secret Santa is a fun and affordable way to exchange gifts without contributing to the overconsumption and waste that often comes with the holiday season. Instead of buying multiple gifts for each person in a group, you can only buy one for the person you drew. It allows to focus on more thoughtful and sustainable gifts that will be appreciated and used.

Photo by Joshua Lam on Unsplash
Astro
Astro is a modern framework for building static websites. It helps you reduce the amount of JavaScript in your sites while still allowing you to use your preferred framework or even plain HTML and CSS. Astro offers several valuable features, such as automatic sitemap generation, designed to be intuitive and straightforward.
Supabase
Supabase is a serverless, open-source Firebase alternative that provides powerful tools for building full-stack applications. Its seamless authentication, real-time subscriptions, and object storage are built on top of Postgres, the world’s most advanced open-source database. Supabase is easy to use and integrate with other tools, making it an excellent choice for developers who want to build or enhance their apps.
In the blog post, we use Supabase to store and retrieve groups and user dates for the Secret Santa demo app. Supabase allows us to store and retrieve users easily and draw data without having to write a lot of code or set up and manage a database ourselves. It can save time and make the development process more efficient.
Format of this blog post
This will be a step-by-step guide focused on setting up Astro, Supabase and integration between them. I extracted a small library of UI components, so we won’t have to focus on styling and UI logic. I’m using Tailwind CSS in the guide and the library.
If you want to skip directly to the source code, you can visit a repository with the code from this guide. There, you can browse the code and see how it works.
Creating a new Astro project
Run the following command to create a new project. Follow the wizard instructions and choose the recommended options. For TypeScript, choose the strictest option. It’s up to you whether you want to initialize a git repository, but I recommend doing so!
Next, we’re going to install React and Tailwind integrations to our new Astro project:
You can run pnpm dev to start your app and see how it looks in the browser.
Customizing styles
I created a small components library for this guide (@everybody-gives/ui) so that we can focus on building the functionality of your app while still creating a nice-looking application. To install the library, run:
Update tailwind.config.cjs
Make sure your tailwind.config.cjs file looks like the following:
js
js
Create postcss.config.cjs
For Tailwind to work correctly, we also need a postcss configuration:
js
js
And the last thing here — create a new folder, src/styles with an index.css file:
css
css
New index page
In an Astro project, pages are files that are located in the src/pages/ directory. As mentioned, we will use components from the @everybody-gives/ui library. Let’s go to the src/pages/index.astro. The .astro extension indicates that it’s an Astro component. In Astro, components are HTML-based templates with no client-side runtime. Components building blocks of the content of a page and have the following structure:
astro
astro
Update the src/pages/index.astro with the following code:
astro
astro
You might have noticed the Layout element — it’s also an Astro component that we’re using to extract some common elements like head and body.
In the newly generated Astro app, we already have a Layout component, but we’ll customize it a bit:
astro
astro
If you open your app in the browser, this is what you should see:

Perfect! We now have a new landing page. The action button points to a /new-group page, and that’s what we’ll cover next!
Adding new Secret Santa groups
To draw names within a group, we first need some information. It includes an event name and a list of participants.
Create a new page
Let’s add a new file — src/pages/new-group.astro:
astro
astro
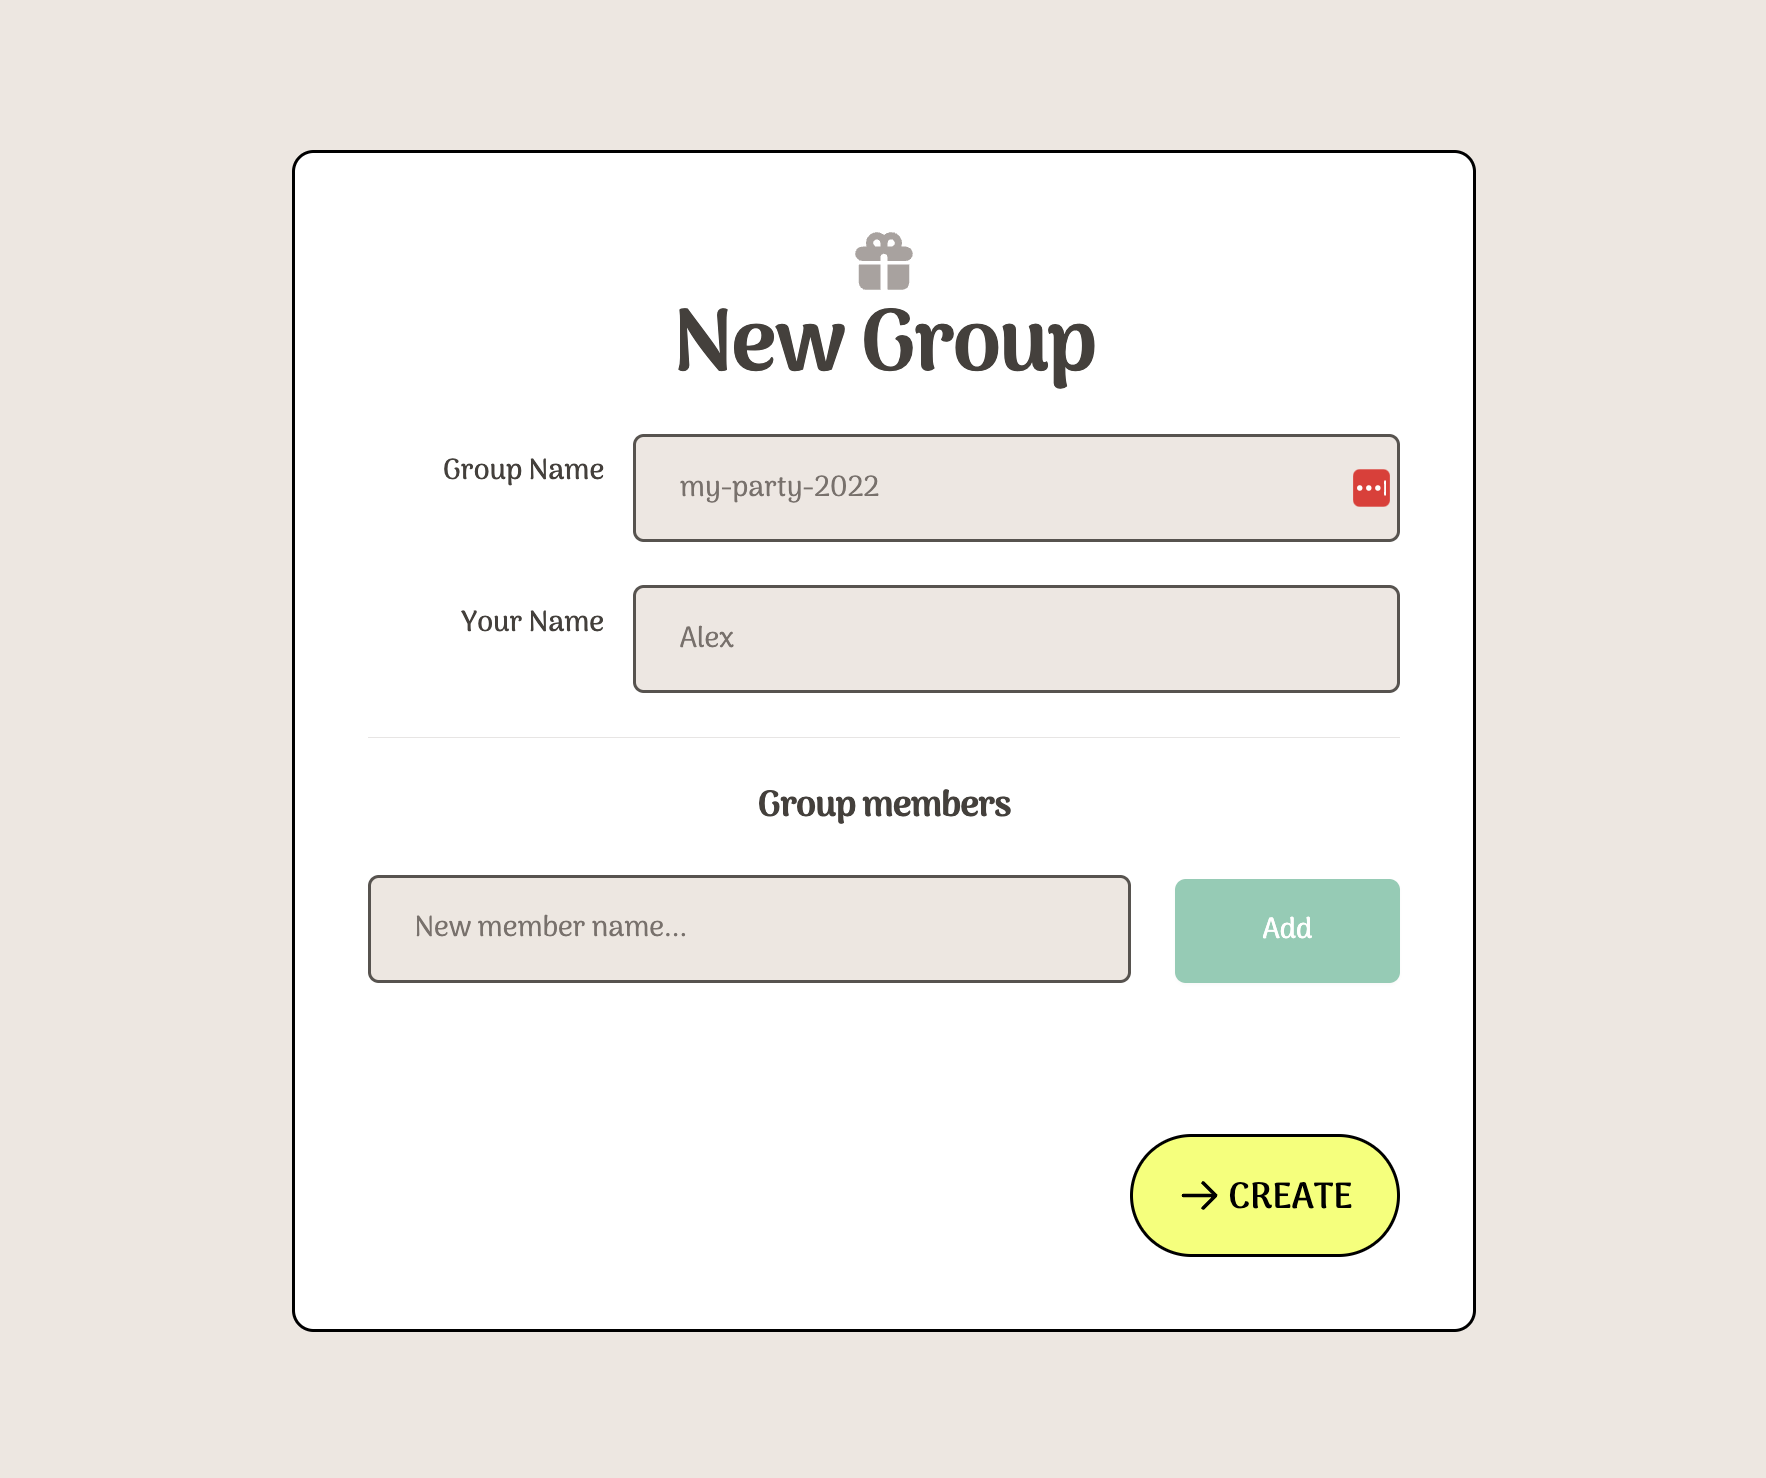
New group form
In our form, we will ask for three pieces of information:
- Group name
- User’s name (creator of the group)
- Members list
The form we will be using is basic, but there is potential for improvement. Here are some ideas for how you could enhance the form in the future:
- Add more fields to collect additional information from participants (e.g. their preferred gift category or budget)
- Use conditional logic to display different form fields based on the responses to previous questions
- Use validation to ensure that participants provide the required information and that it is in the correct format
Let’s create an src/components/NewGroupForm.tsx file. All utility components are imported from the @everybody-gives/ui lib.
tsx
tsx
Add the form to the Astro page
We have to include the NewGroupForm in the new-group page.
Astro, by default, generates website with zero client-side JavaScript.*Our form needs client-side JavaScript, so we need to add a client:load directive:
astro
astro
Now, NewGroupForm is interactive, while the rest of your website remains static and zero JS. Here, you can read more about client directives.
If you open https://localhost:3000/new-group, you should see this form:
In the next section, we’ll cover setting up a Supabase project, creating new tables in the database, and saving the group after submitting the form.
Supabase project initialization
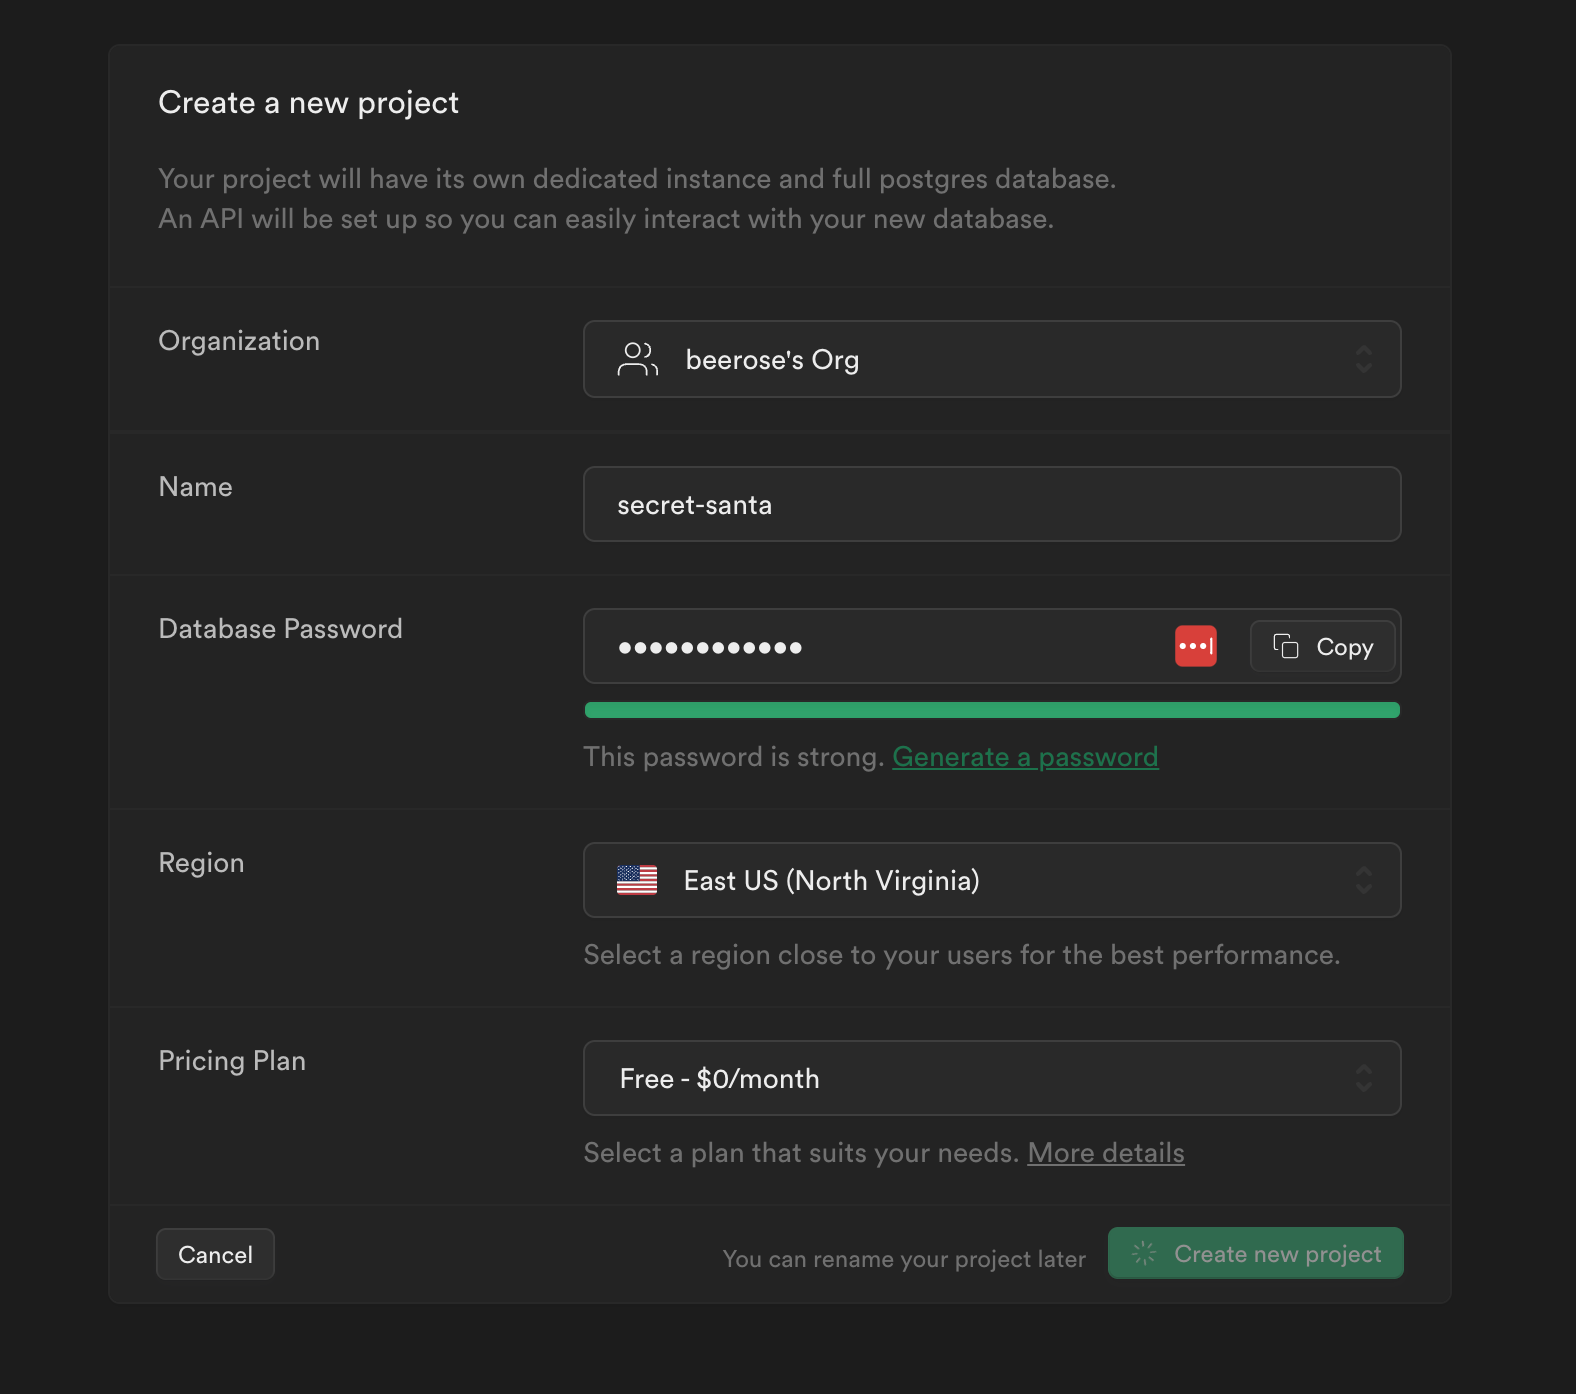
To create a new Supabase project, follow these steps:
- Go to
supabase.comand click “Start Your Project”. - Authenticate with your GitHub account (or email and password).
- Create a new project under the organization provided to you in your account. Follow the instructions on the page to complete the setup process.
Adding a new table
After you have created your project, you can create a table for your app by clicking on the SQL Editor in the left sidebar.
Paste the following SQL query in the Supabase editor:
sql
sql
We are creating one table to store group information and a separate table for members. We’re also adding a unique constraint on the (group_id, name) so that we have distinctive members within groups.
Setting up Supabase
Firstly, let’s add Supabase to our dependencies:
Then, we need to update environmental variables to be able to initialize a Supabase client. Create an .env file and add the following keys:
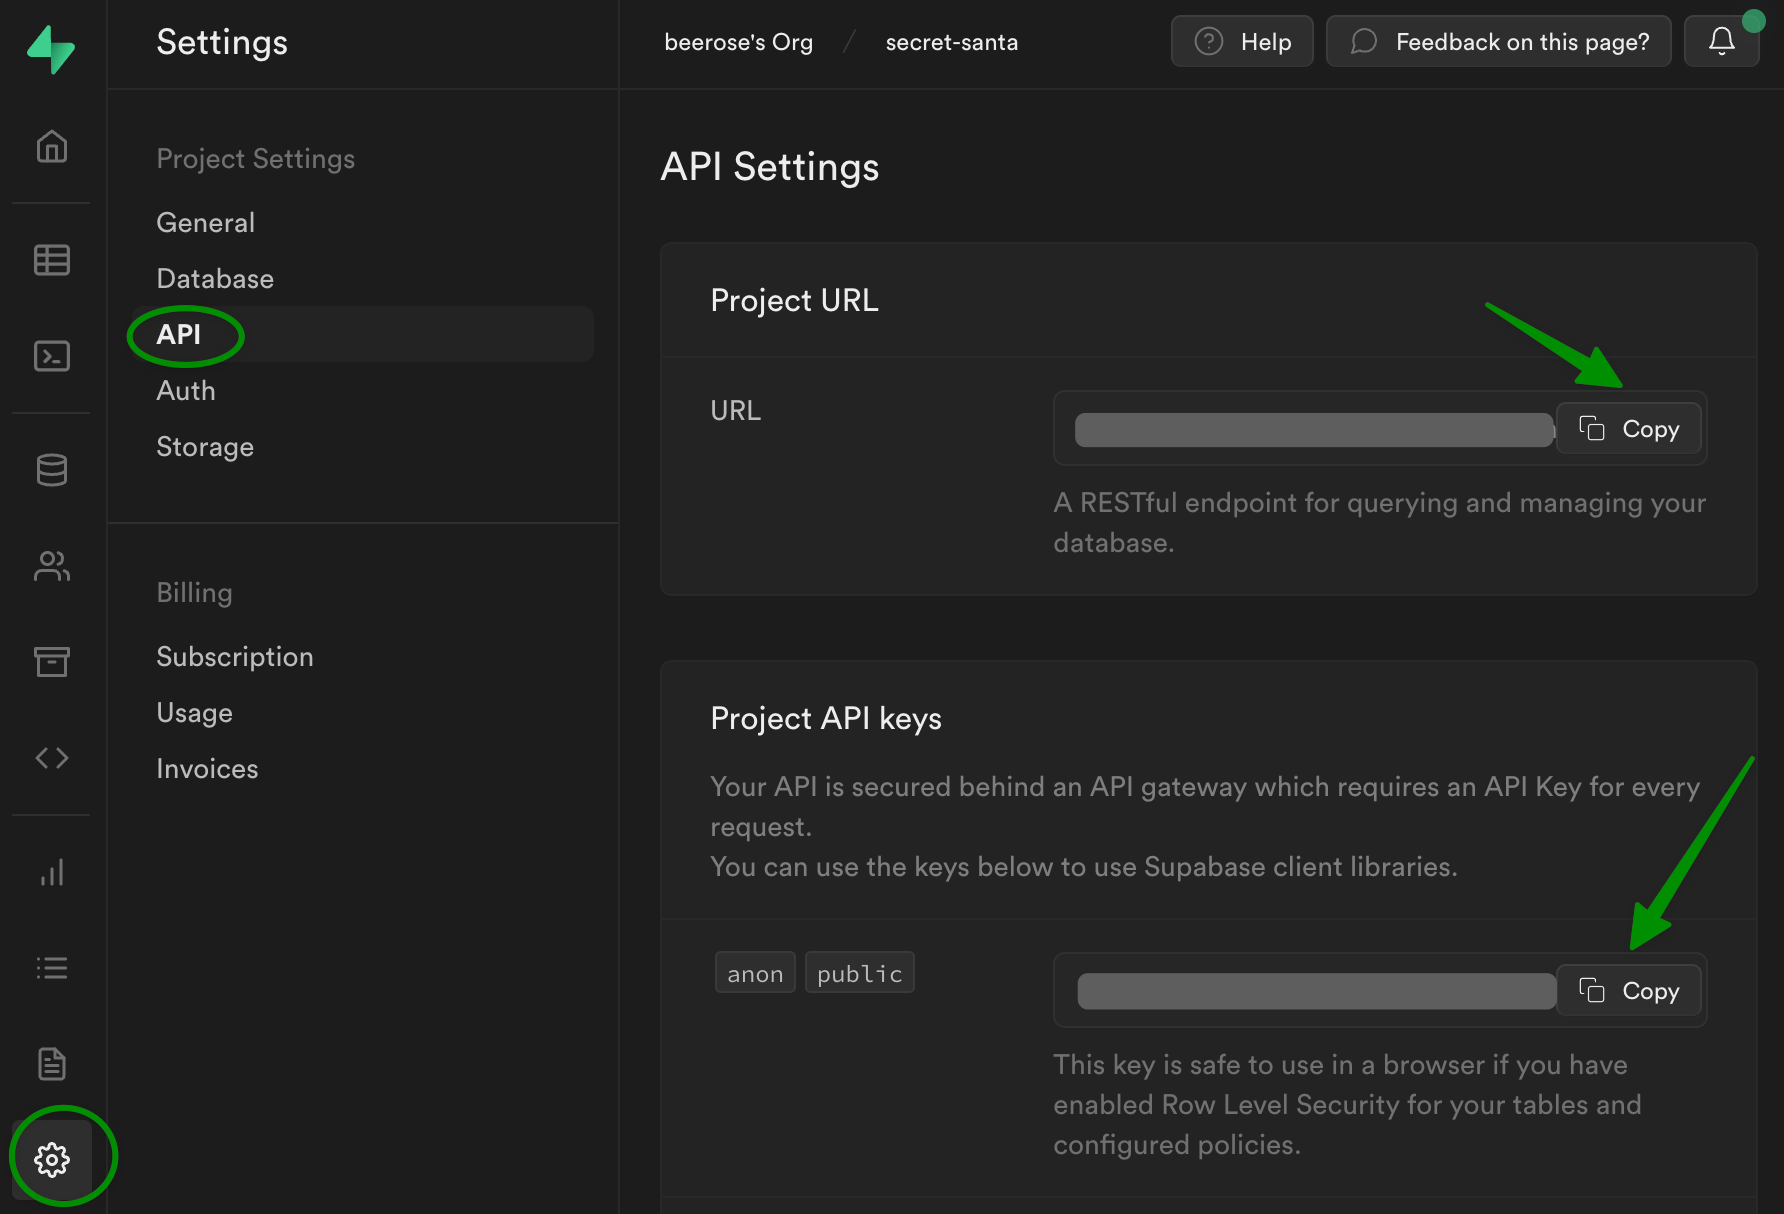
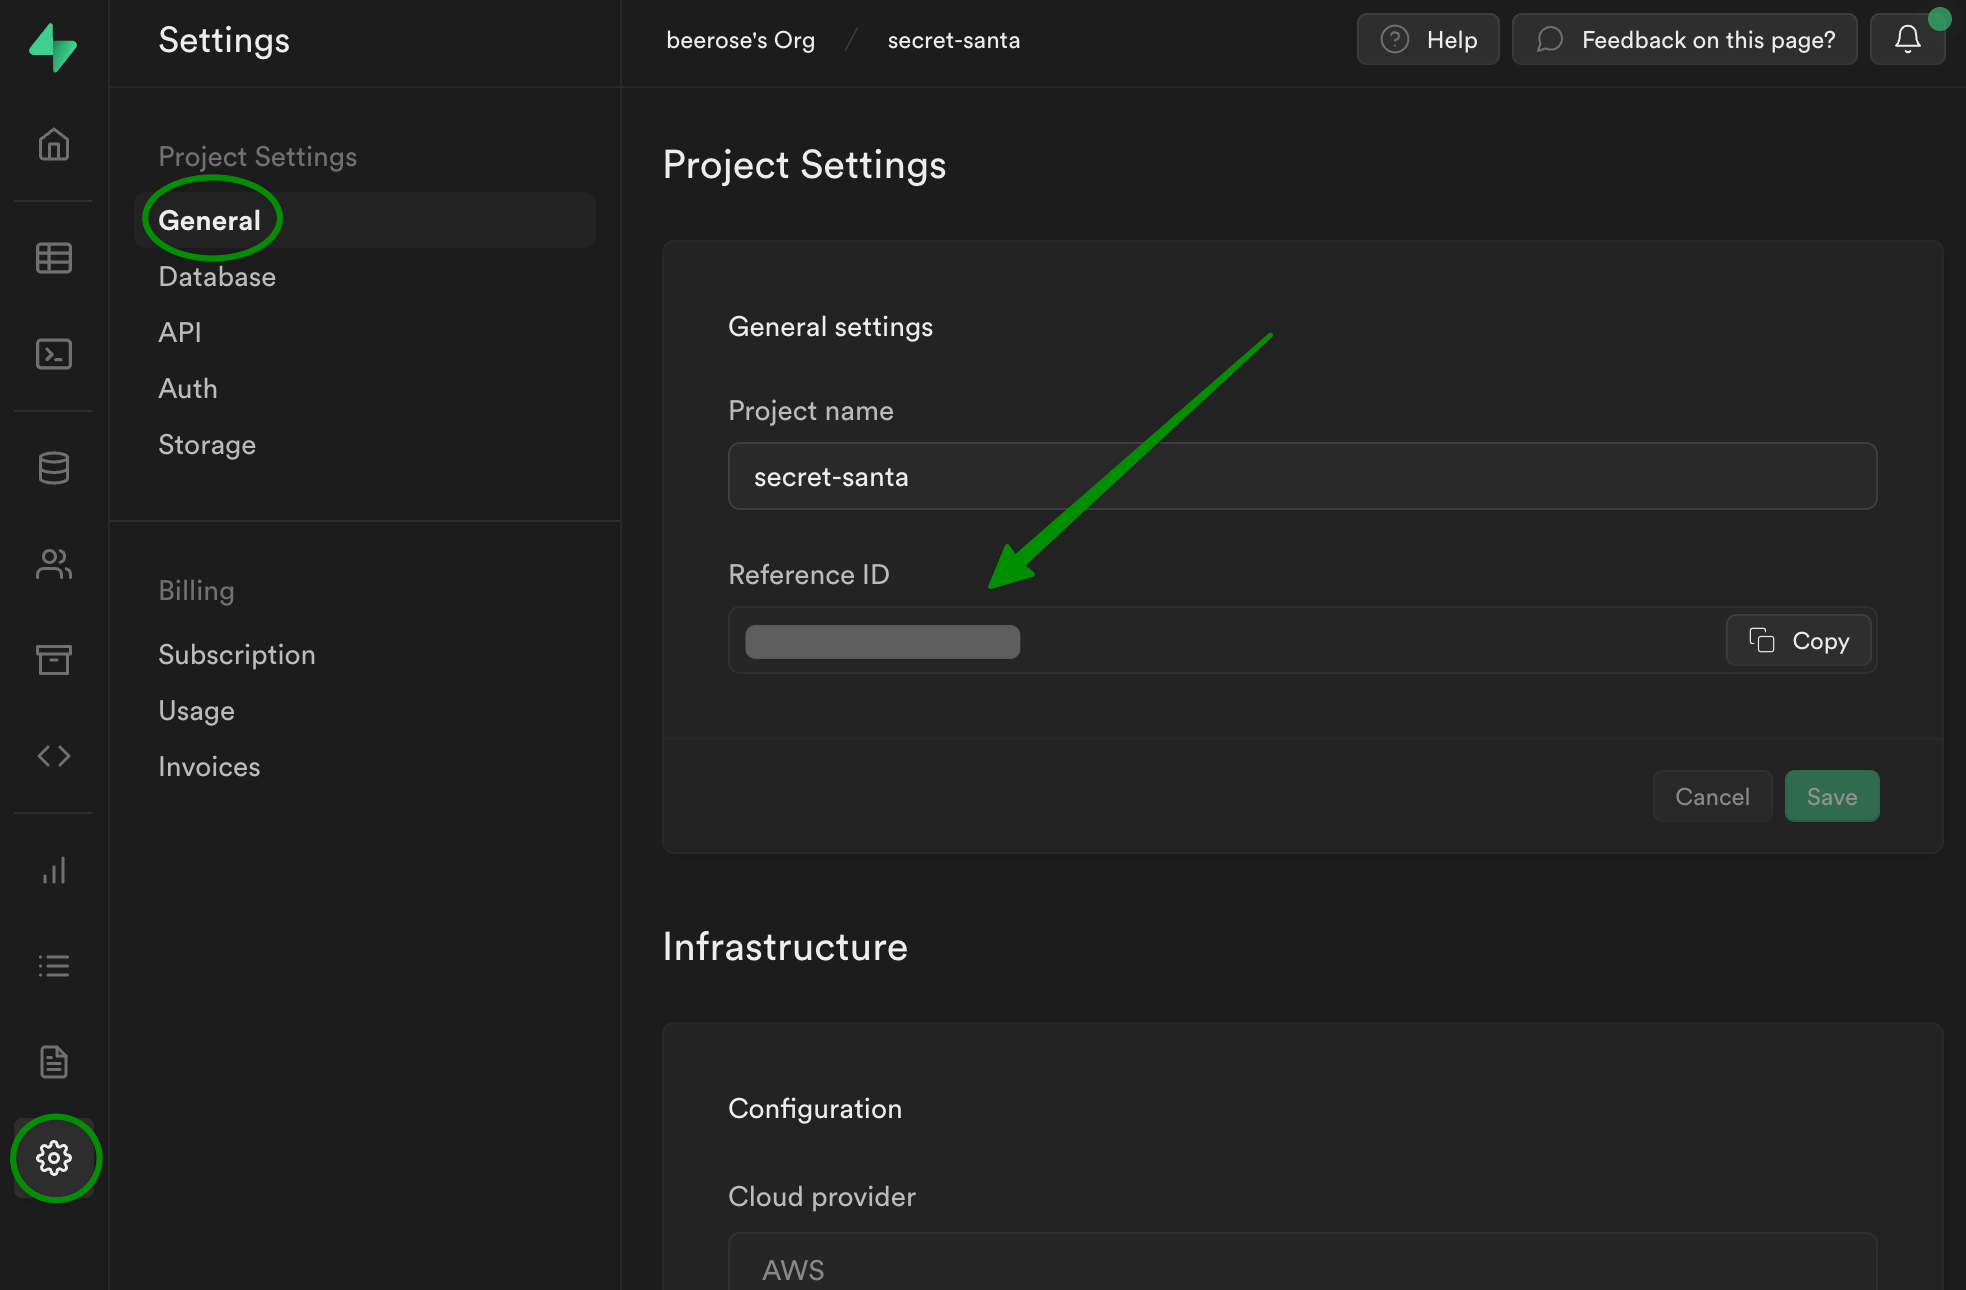
You can find them in the Supabase dashboard on the Settings -> API page:
Generating TypeScript types
Before we initialize a new Supabase client in our app, let’s generate types from our database to have TypeScript support and auto-completion.
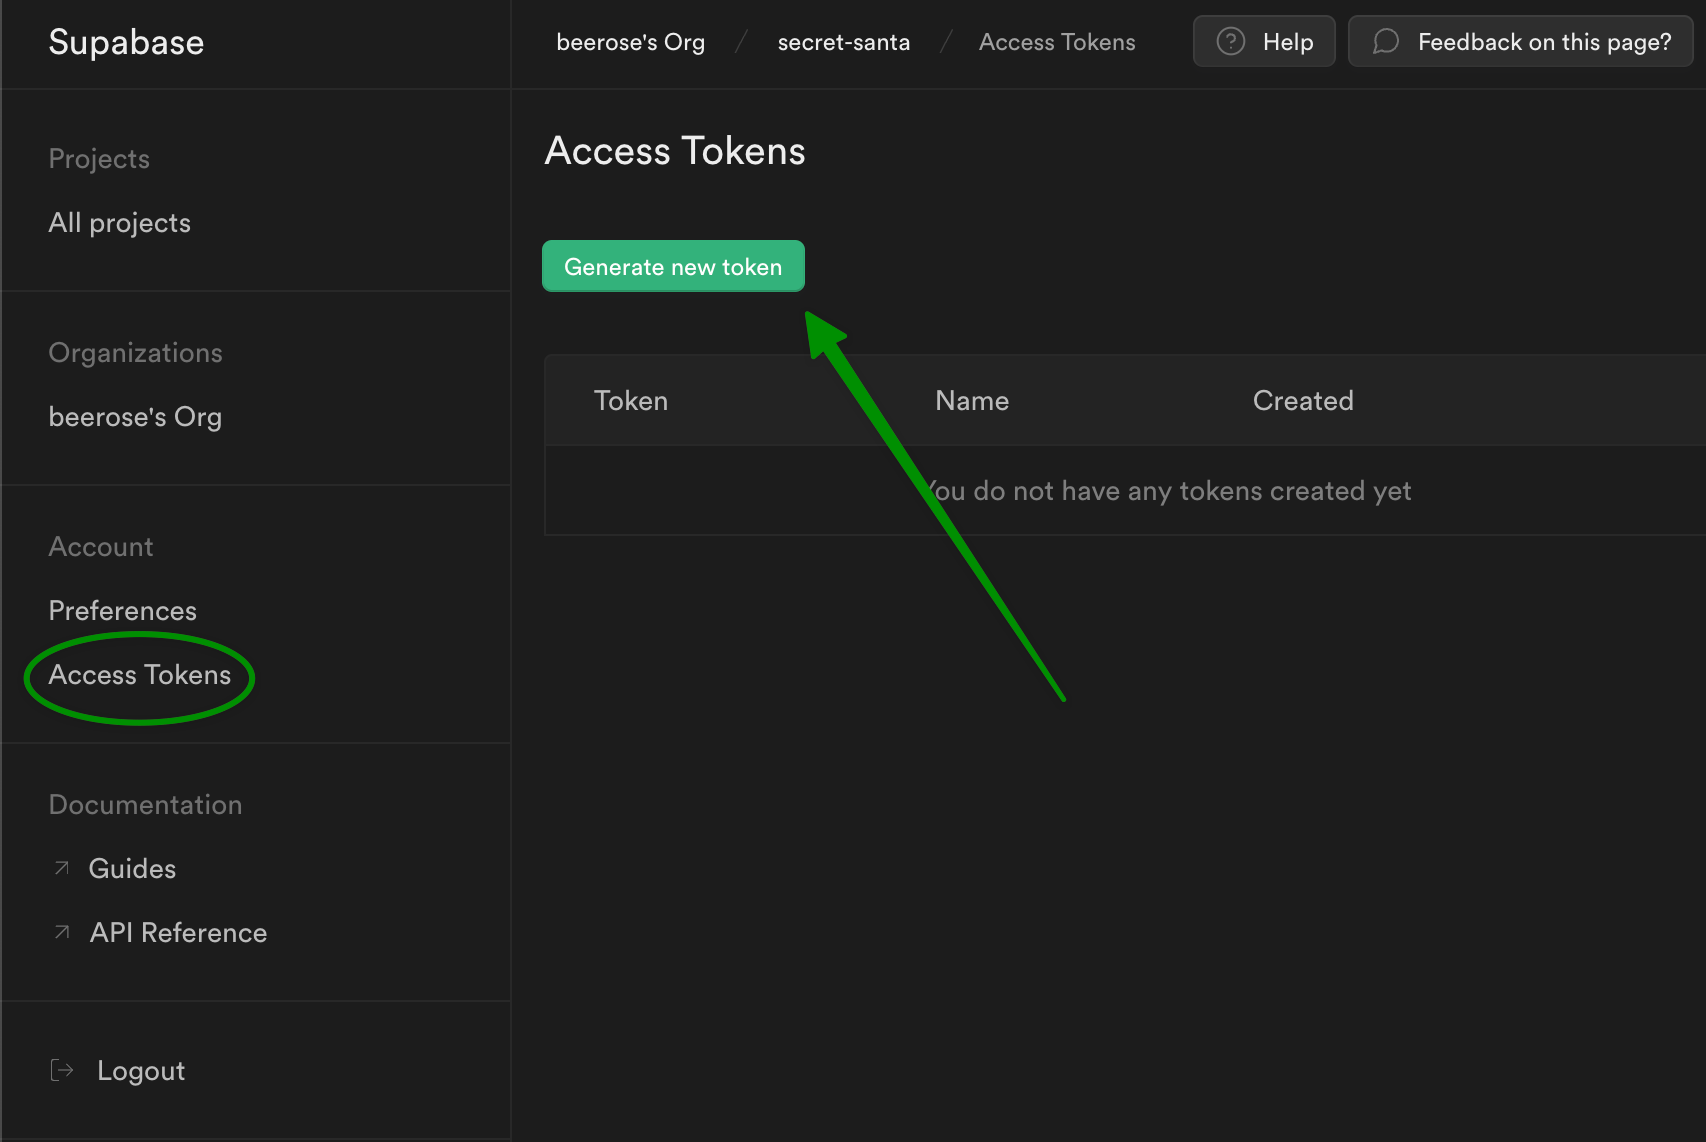
First, we need to authenticate. For that, run:
It will ask you for your access token. You can generate it in your organization’s settings:
Once you’ve successfully authenticated, run this command to generate types:
Don’t forget to replace <PROJECT_ID> with your project’s id, which you can find on the settings page:
Once you run the command, copy the output and paste it into a new file: src/types.ts.
Creating Supabase client
Let’s create a src/supabase.ts file. Inside, we’ll initialize a new client:
ts
ts
We’re passing the project’s URL and a public key that we stored earlier in the .env file. In Astro, instead of using process.env, you can use import.meta.env, which uses the import.meta feature added in ES2020. We also provide the generated Database type as a generic parameter to the createClient function.
Saving new groups in the DB
Now that we have both UI and Supabase setup ready, we can call the API and store the new group form’s content in the database.
Let’s go back to the NewGroupForm.tsx file and update the onSubmit function with the following code:
js
js
As you noticed, I’m only printing the error here. Feel free to pause here and handle the error in the UI. You could, for example, show an error notification or display the error below the submit button.
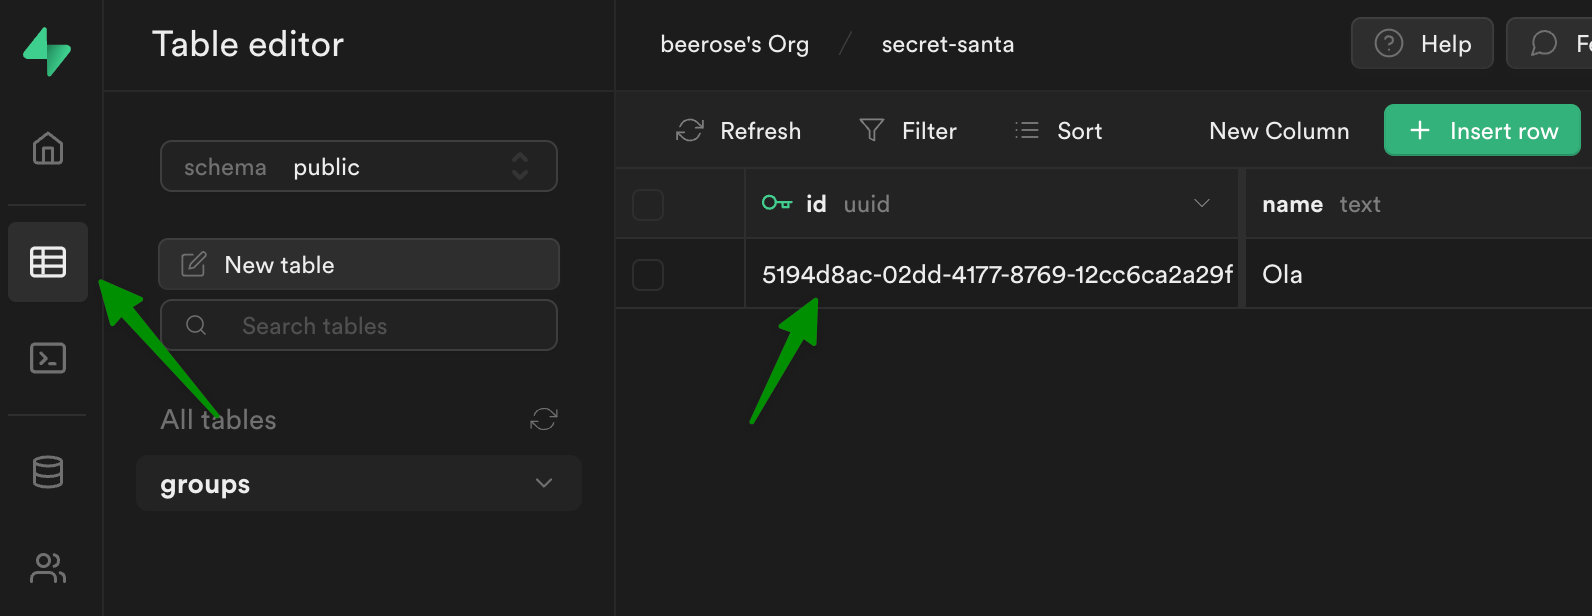
You can test it out and create your first group. You can see if it was properly created in the Supabase dashboard in the database section:
Group page
Now that we can create groups, we need to display them in the application. But before we add a new page, we will create a new React component which shows all group’s info:
tsx
tsx
Now, let’s add a new page. We will use dynamic routing.
An Astro page file can specify dynamic route parameters in its filename to generate matching pages. For example, you might create an authors/[author].astro file that generates a bio page for every author on your blog.
authorbecomes a parameter that you can access from inside the page.
In our case, the dynamic parameter will be a group id.
As later we will have more than one page under https://localhost:3000/[groupId], we will create a folder with a dynamic parameter — /src/[groupId]. Inside of this folder, we will create an index.astro page, which will match https://localhost:3000/[groupId]:
astro
astro
Since we don’t know the ids ahead of time, we’ll use SSR mode. That requires setting output: 'server' in the Astro config:
js
js
Then we are still left with a bunch of things to do on the group page:
- Handle missing user names in the URL. The
GroupInfocomponent needs the current user’s name, and we need it to know who’s drawing a person. - Fetch the group’s information from Supabase.
- Add drawing a name functionality.
We’ll cover them one by one.
Handle members’ “login”
I put login in quotes because we won’t be doing any authentication. We will only provide a way for group members to choose their names from a participants list before accessing a group page.
We’ll create a new page — src/[groupId]/name.astro. Inside we will display a list of group members, and when a user picks their name, we’ll redirect them to the group page:
astro
astro
Currently, the members are hardcoded, so let’s retrieve them from Supabase:
js
js
Now, let’s go back to the src/[groupId]/index.astro file, and redirect to the page we just created if there’s no user in the URL:
astro
astro
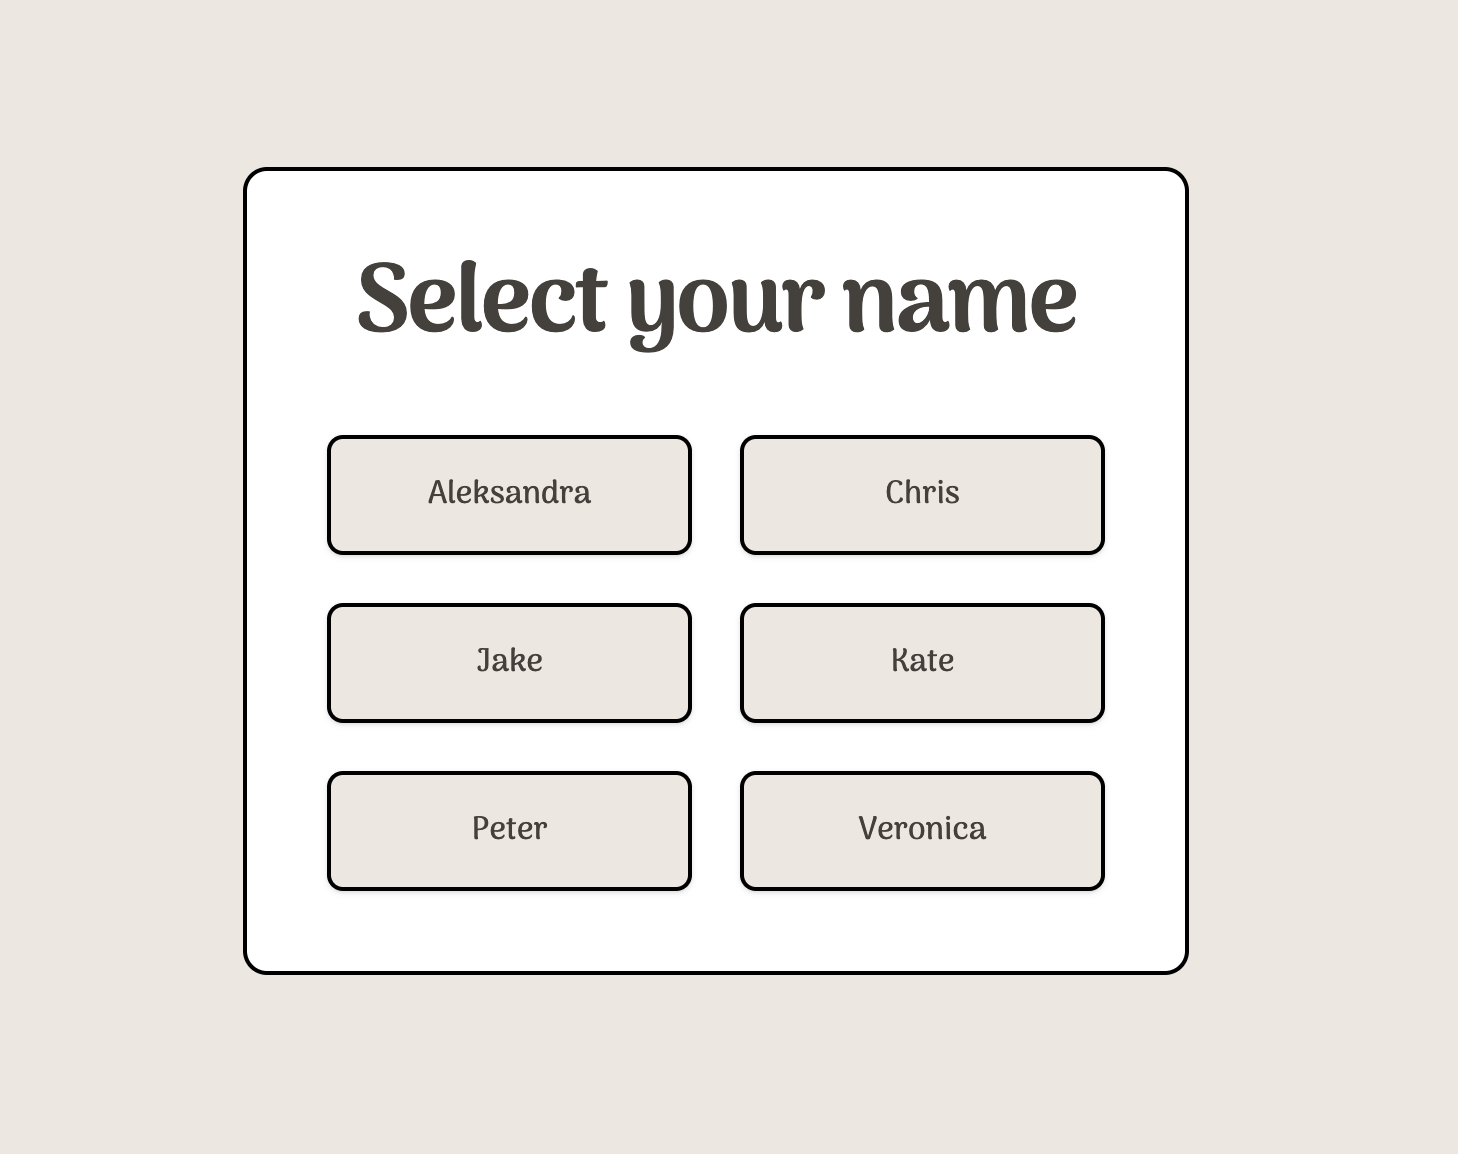
Now, if you try to access an existing group at http://localhost:3000/<group_id>, you should see a list of all participants:
Let’s go back to the group page! We still have two things to cover:
- ✅ Handle missing user name in the URL.
- Fetch the group’s information from Supabase.
- Add drawing a name functionality.
Fetch group info from Supabase
We already saw how to fetch information from Supabase on the name.astro page. Now we will do something very similar. Open src/[groupId]/index.astro and fill in the missing logic:
astro
astro
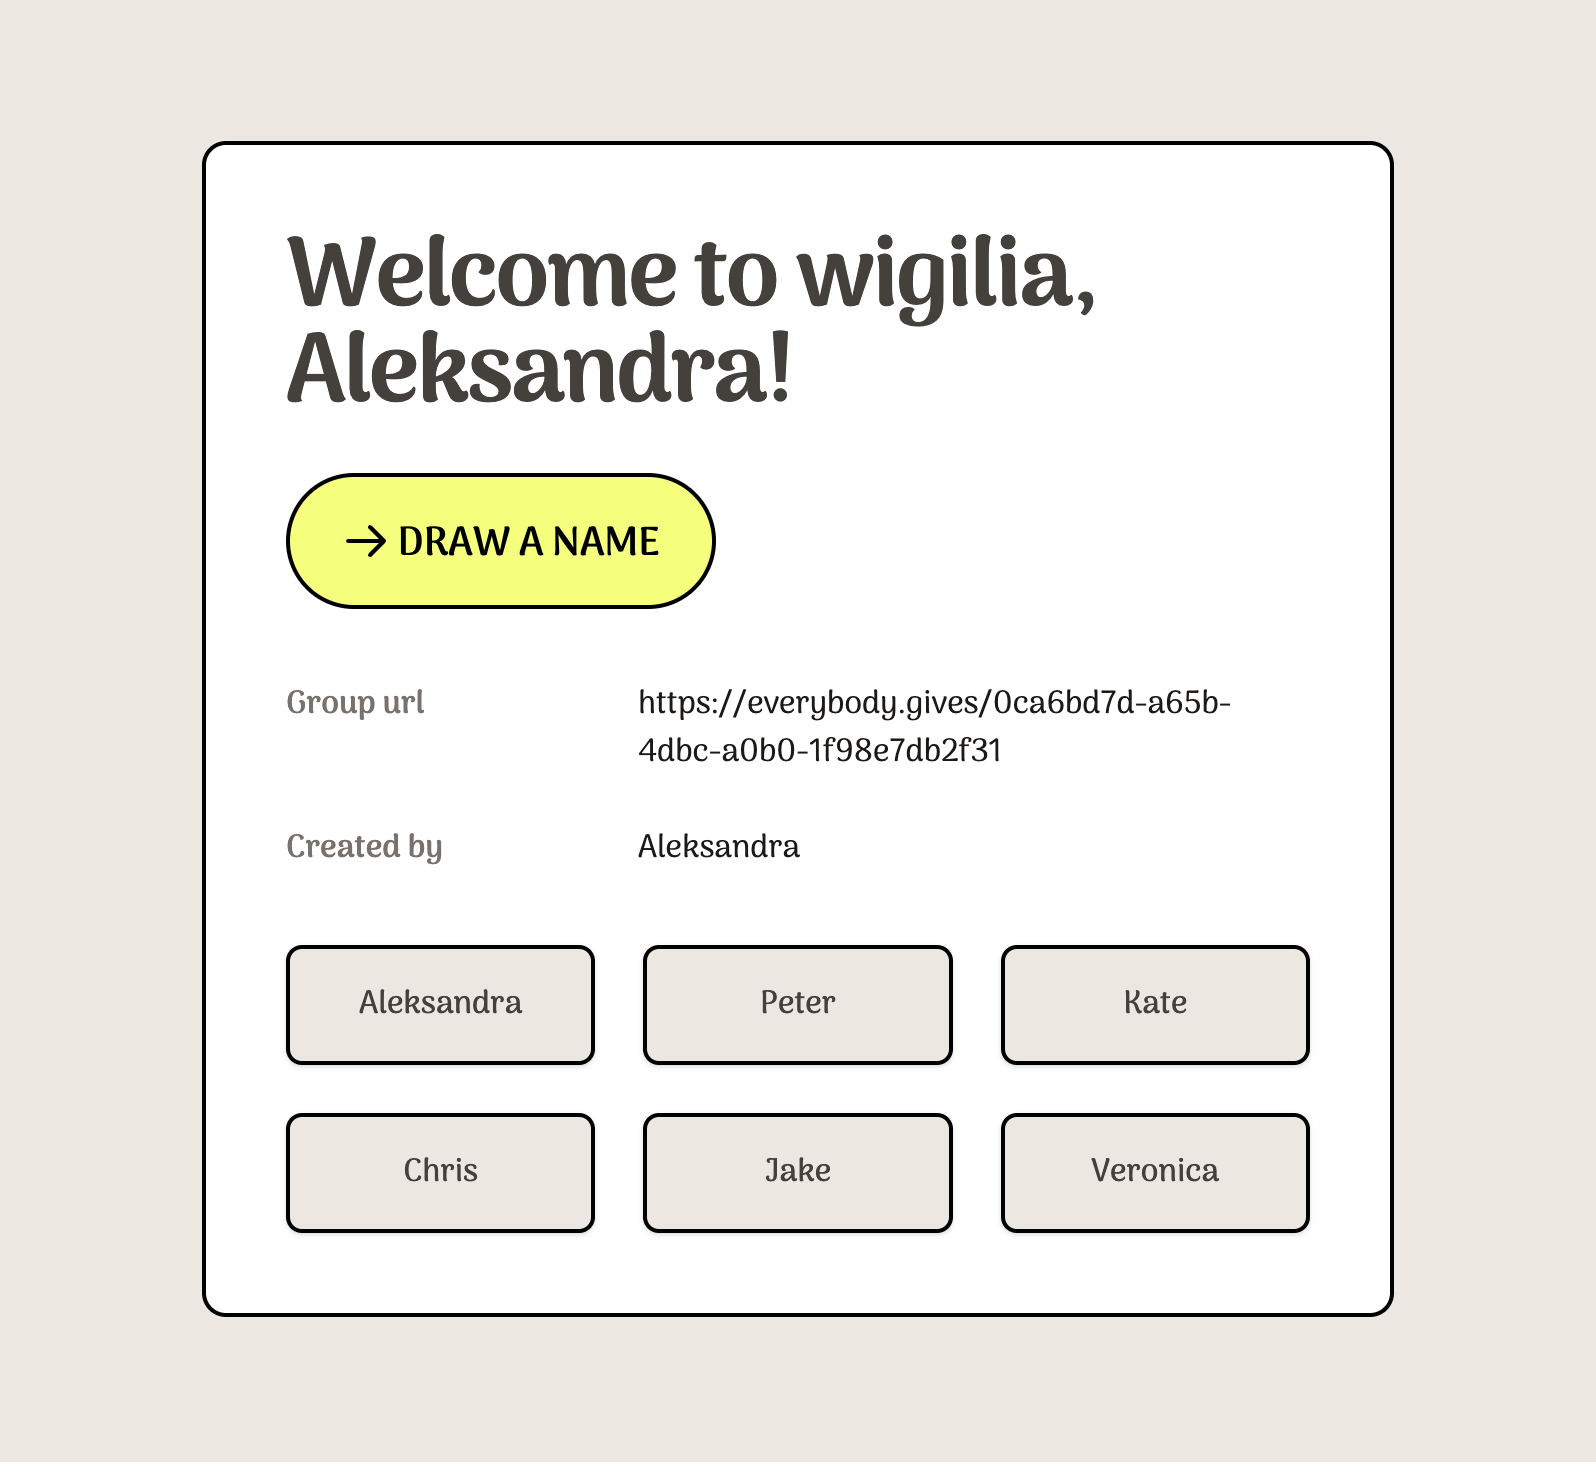
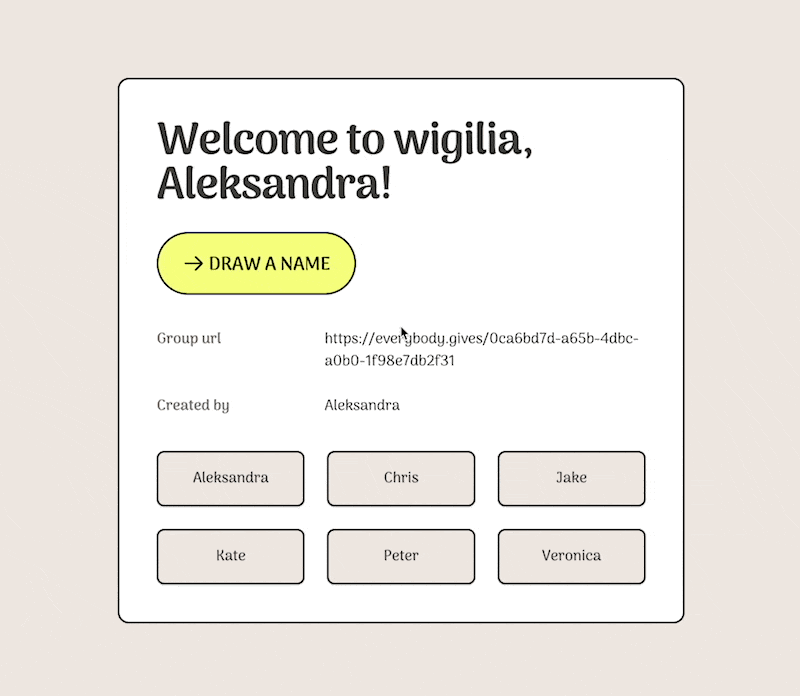
Now, after selecting your name, you should be able to see a group page with full info:
Let’s dive into the last item on our list!
- ✅ Handle missing user name in the URL.
- ✅ Fetch the group’s information from Supabase.
- Add drawing a name functionality.
Drawing a name with RPC API
I thought it would be cool to use Supabase’s rpc API for this.
You can call Postgres functions as Remote Procedure Calls, logic in your database that you can execute from anywhere. Functions are useful when the logic rarely changes—like for password resets and updates. https://supabase.com/docs/reference/javascript/rpc
Let’s go to the Supabase dashboard and open an SQL editor. Inside we will create a new Postgres function. It takes two arguments: group_id and username.
It uses the group_id argument to filter the rows in the members table, selecting only rows where the group_id matches the specified value. The username argument is used in the UPDATE statement to set the selected_by column to the specified username for the row with a name value selected randomly from the members table. Then, it also returns the name of the randomly selected row as the result of the function.
sql
sql
Since adding a new function means schema update, we need to generate Supabase types again:
Don’t forget to update src/types.ts!
Now, let’s go to the GroupInfo component, where we’ll use the draw_name function:
js
js
You can test it out in your browser. This should be the final effect:
Bonus 🎊
Let’s add some sprinkles to our app! Whenever a user draws a name, we can display a confetti animation with react-rewards library. Run the following command to install it:
Next, we need to update the GroupInfo.tsx file:
diff
diff
Summary
Great job! Now that you’ve mastered the basics, you can use your new skills to build even more exciting projects with Astro and Supabase. Have fun exploring the capabilities of these tools, and see what you can create!
If you have any feedback on this blog post, feel free to reach out via Twitter, or if you want to contribute, here’s the post’s source code.
Links
This guide was based on the app that I originally built with Blitz.js. If you want to check out an extended version of what we made in this guide, visit: everybody.gives.
Future improvements
Here’s a list of some potential improvements that you could make to the app:
-
Implement authentication and user accounts so that users can securely create and manage their groups and gift exchanges. This could be done using Supabase’s built-in authentication and user management tools.
-
Allow users to invite others to join their group by email or by sharing a unique group code. This would make it easier for users to organize gift exchanges with friends and family.
-
Error handling: we could add error messages or other visual indicators to inform the user when an error has occurred. This could be done by displaying an error message in a pop-up window or highlighting the relevant form field in red to indicate that it is invalid.
-
Add form validation — make sure that the user provides a minimum of three members.
-
Filter names in the
[groupId]/namepage — we could skip showing those users who already drew a name. -
Add exclusions. Exclusions would allow users to specify certain people that they do not want to draw in the gift exchange.